Tuesday, December 7, 2010

Here, kitty kitty


Meow meow meow
meow meow
meow!

Thursday, November 11, 2010

Does it seem like I'm the worst blogger ever? And butternut squash ravioli.

I know I haven't posted any tasty things in months. MONTHS!
But yesterday I made butternut sqash ravioli and I want to tell you all about it.

Did it take about three hours? Yes, it did. Was it totally worth it? Yes, it was.

Did I do that totally lame thing I do and not take any pictures, even though everyone knows that's the whole point of a food blog? Ummm..... maybe. But I'll tell you how to make ravioli! That should count for something, right?

You'll need:
One butternut squash
One box firm silken tofu (such as Mori-Nu)
One medium onion
Dried sage
Garlic powder
1/2 lemon
2 tsp white miso paste
1/4 cup nutritional yeast
2 cups flour--I used 1 cup each of semilina and whole grain spelt. I don't necessarily recommend using the spelt, since it's rather low-gluten and therefore a little hard to handle in the dough. That said, I did it and it turned out fine.
Olive oil
Salt and pepper

First, make the squash: Use a big sharp kitchen knife to cut the very top and bottom off the squash. Use a vegetable peeler or paring knife to peel off the skin, and scoop the seeds out of the middle. Cut the squash into 1-inch cubes, coat with a little oil, and bake at 400 degrees until they're very tender. (This will take about 20 minutes.)

For the dough: Combine 1/4 of the tofu, 1 tsp. of sage, 1 tsp. salt, 2 Tbsp. olive oil, and 3 Tbsp. water in a blender. Puree until smooth. Sift the flour into a large mixing bowl or onto a large clean surface, like a cutting board. Make a well in the center of the flour, and pour the tofu mixture into the middle. Using your fingers or a fork, incorporate the dry stuff into the wet stuff. If it's really too dry, you can add a little more water, one tablespoon at a time. You need to really knead this dough a lot before it will come together, so don't get discouraged! Once the dough finally comes together, knead it for about five minutes so that it can get nice and stretchy. Wrap it up tightly in plastic wrap and let it rest at room temperature for an hour.

While the dough is resting, combine the miso, juice of half a lemon, and a drizzle of olive oil. Mix until it's all incorporated. Add the rest of the package of tofu, and mash it all together. It doesn't need to be perfectly smooth, but you want the tofu to absorb all the flavors. Add salt and pepper and garlic powder to taste.

Next, cut the onion in half, and slice thinly. Heat 2 Tbsp. olive oil in a saucepan over medium heat, and add the onion to it. Add 1 tbsp of dried sage. Stir occasionally until the onion is nice and brown and caramelized. (This part makes the whole house smell yummy.)

Add the squash to the onion and smush with the back of a fork and comine the squash and onions into a nice little filling for your ravioli.

Now, tear off a small hunk of dough--more or less 1/3 cup. Place it on top of a piece of wax paper and pat it out into a flat round disc. Use a rolling pin to roll it out (very gently) until it is about 1/4 inch thick. Now, do exactly the same thing to another piece of dough so that you have two pasta sheets of about the same size. Lay one sheet on a flat surface and scoop teaspoonfuls of the tofu mixture about 3 inches apart. Scoop the squash in the same way right on top of the tofu. Use your finger or a pastry brush to brush some water around all the little mounds of filling. Lay the second sheet of dough on top of this and gently press the dough down around the scoops of filling so that it will stick. Use a knife or cookie cutter to cut out the raviolis, and place them on a plate dusted with cornmeal or flour. Continue to do this until all your dough is gone--you can re-roll the scraps of dough until you run out.

Now just boil them in salted water until they float! Now you are an accomplished ravioli chef. (Just like Chef Boyardee?)

Monday, August 2, 2010

Pesto is yummy

Pesto is one of those foods that I could eat every day.
For a long time I would just follow a traditional pesto recipe and omit the cheese, but something seemed to be missing. Then one day I had the idea to try adding some miso. It turns out I'm not the first person to have thought of this (not by a long shot, it's all over the internet) but it's a good trick! I find that it gives the whole thing a little bit of a salty kick, sort of how parmesan cheese would. And the only real work involved is cleaning the blender at the end!

Ingredients:
1 bunch of basil (about two cups)
1 clove of garlic--(Seriously, you don't need a lot! It tastes stronger when it's raw!)
juice of 1 lemon
1/4 cup walnuts or pine nuts
1 Tbsp. miso paste (you'll need more or less depending on what kind of miso you used, since some are mild and some are pretty sharp. I used white miso, which is pretty mild.)
olive oil

1.Wash the basil and remove the stems. Put the basil leaves in the blender, along with the walnuts, lemon juice, and miso. Smush the garlic with the side of your knife, give it a very rough chop, and add that too. Give everything a whirl until all the ingredients are pretty evenly mixed.
2. Now you can start adding olive oil through the hole in the lid of the blender! (Oh, is that what that thing is for???) Drizzle the oil in a little at a time until the mixture is relatively smooth enough for you--this is kind of a matter of taste so you'll have to judge for yourself.
3. This is the most important step: taste it! Add more miso if you want, and season with black pepper. (The miso is salty, so you probably won't need to add extra salt to this.)
4. Spread it on your sandwiches, toss your pasta and veggies in it, cry when it runs out...

Monday, July 12, 2010

Fennel, I'd love to get to know you better

There's something about fennel that seems to just scream, "fancy!" It's fragrant and dainty and my parents never fed it to me, which I guess just adds to the mystique. But what should I do with it now that I've brought it home from the store?

Here's what: put it in everything! Especially pasta salad.
I know, I know, everyone is so sick of pasta salad (or is it just me?) Well, no more!

Pasta salad with fennel (Or maybe I should call it, fennel salad with pasta.)

Cook and drain one pound of whole wheat rotini. Toss with just enough olive oil to coat while its still hot--this will prevent sticking.
Chop 1/2 cup of fresh basil leaves (Got more? Good, add them too!) Add this to the pasta.
Cut 2-3 large ripe tomatoes and add to the pasta.
Finely chop a quarter of a vidalia onion and add this to the pasta, too.
In a small bowl, gently smush 1 can of white beans with the back of a fork. Add salt and pepper to taste, and a nice healthy squeeze of lemon juice. Add 1/4 cup of nutritional yeast if you have some lying around.
Wash and thinly slice 1/3 of a bulb of fennel, and add to the salad. If it has the little leaves on it still, you can roughly chop those and add them, too.
(If you feel like it, you could roast the fennel before putting it in here, but it was way too hot to turn on the oven when I made this!)
Add the beans to the pasta and toss everything around.
It's best if you let it sit overnight so the flavors really have a chance to meld. Take it out of the fridge about 40 minutes before serving so that it can come to room temperature.
EAT IT! You can serve it over salad greens or next to just about anything.

Sunday, June 27, 2010

Hooray for vegan cupcakes on the Food Network

Chloe Coscarelli, an LA-based vegan chef, won cupcake wars--yay! I'm really glad to see that the (very mainstream) Food Network is finally catching on.
Here is an interview with Chloe on VegNews.
I'd also like to point out that the runner-up said some kinda snotty things about Chloe's vegan baking (or rather, about vegan baking in general) and came across looking like a bit of a narrow-minded sore loser, and I hope she learned her lesson!
And I can't wait to try Chloe's winning recipe for chocolate strawberry shortcake cupcakes.

Wednesday, June 23, 2010

Summer Makes Me Lazy

Summer makes Stella lazy, too.

All I want to eat is sandwiches and salad and--as I believe I've mentioned before--vegan ice cream. And you all know how to make your own sandwiches and salads, so I'm not going to bore you with silly recipes. But pictures are ok, right?


This one is fresh corn, tomatoes, green pepper, parsley, olive oil, hot sauce and red wine vinegar, with salt and pepper. Nom!


Avocado melts are YUMMY. Cut up some avocado and arrange it on some wholeo-grain bread and add a slice of vegan cheese (I've been buying Tofutti slices, but I've heard Daiya is the best ever, so I guess I'll have to try that too.)
Stick it under the broiler until the cheese melts, and then eat it while complaining that it goes straight to your thighs.


Then, take a nap.

Sunday, June 6, 2010

We all scream for (soy) scream

It is HOT here in Brooklyn, and humid as well! So I've been eating ice cream a lot. Sometimes in lieu of actual meals.

Hot Fudge Sundaes are the best!
Sure, it's animal friendly, but keep it away from your dog.

To make hot fudge: Finely chop 3 oz. bittersweet chocolate. Put it in a saucepan with 1 c. soy milk, 2 tbsp. light corn syrup and 1 tbsp. agave nectar (you can use all corn syrup but I like the caramelly sweetness of the agave, I think it adds depth.) Add 2 tpsp. vegan margarine. Stir over medium heat until the chocolate is all melted. Bring to a boil, stirring often. Once it comes to a boil, cook for five minutes, stirring often. After five minutes it should be thick and viscous. Pour it into a sturdy glass jar, and add 2 tsp. vanilla extract and (optional) 1/8 tsp. almond extract, along with two pinches of kosher salt.

To make a sundae (as if you don't know perfectly well how to make a sundae), scoop some vegan ice cream into your favorite bowl. I'd like to try making my own s'cream, but that's a post for another day. (Laziness, ahoy.)
Top with your choice of sliced bananas, shredded coconut, nuts, sprinkles, fruit, hot fudge, vegan marshmallow creme, and anything else you want! Top with a cherry if you like to be fancy/nostalgic. Some combinations I like are:
Chocolate ice cream topped with toasted coconut and slivered almonds
Tofutti Wildberry Supreme with fresh berries. As soon as I can get my hands on some vegan marshmallow creme, I'll be adding that, too! Mmmmmm.

Friday, June 4, 2010

Cheater "Chicken" Salad

I can't really take credit for this recipe, since I started with Trader Joe's mock chicken stir-fry strips. I just made the dressing. But it's hot outside, and this was quick and easy! So this is like The vegan version of "Semi-Homemade with Sandra Lee." Except that I wont' tell you how to make a cocktail and tablescape (what even is a tablescape?)
I can't find my camera so I didn't take pictures (I'm sorry!!! I'm the worst at that!)
Naturally, I didn't actually measure anything (because when do I ever do that?) but here's what I did:
First, I chopped half of the package of strips into little chunks, and added some finely diced celery, and chopped scallion and parsley.
In a measuring cup, I mixed the juice of half a lime with two heaping tablespoons vegan mayo. I added about a quarter teaspoon of grated ginger, and a tablespoon of finely chopped jarred lemongrass. It was still a little bland, so I added tiny splash of rice vinegar and a few drops of sriracha chili sauce, which I've been adding to everything lately.
Then I stirred the dressing into the salad and refrigerated it for a couple of hours.

Wednesday, May 19, 2010

Rename nutritional yeast!

Ok, I like nutritional yeast. It gives me vitamins and it makes vegan mac and cheese possible.
BUT
it needs a better name. Something that sounds like food.
What should we call it?

And I just took a two hour final exam in biology tonight so that's all for now, I'm gonna go to sleep. See you in the morning!

Friday, May 14, 2010

A tiny post on this fine spring day

Today was my last day of classes as an undergrad! Hooray, obviously, but also I know that I'll probably just be nostalgic about college for years to come. (Blah blah blah, right? On to the recipes.)

I just had a lovely quick lunch of pasta with zucchini and garlic and some basil and nutritional yeast, and it was so good I just had to write about it, even though I devoured it much to fast to take a picture. That's ok, you know what pasta looks like! Here's how I made it, in case you want to give it a try, but I didn't measure anything so be warned.

Pasta with Zucchini and Garlic
First, cook up a serving of pasta-I used some broad noodles that I found in the cupboard.
In a skillet, heat enough extra virgin olive oil to coat the bottom of the pan. Add one clove of sliced garlic, and 1/4 to 1/2 of a zucchini, slivered up into matchsticks. Stir over medium heat until the zucchini is tender. Add a little bit (maybe one ounce) of drained and crumbled extra-firm tofu. Add salt and black pepper to taste, and a generous sprinkle of nutritional yeast. Add the pasta and stir-fry for a minute until everything is combined. Add some chopped fresh basil and parsley. EAT!
(I bet you could add some cherry tomatoes to that with delicious results, too.)
Here is a picture of the basil I just planted in the front yard of my house. I'm not sure if it will make it (it's not looking too healthy, unfortunately) but if it does, hopefully the students that live here next year will enjoy it!


And now it's time to go study for finals.

Tuesday, May 4, 2010

Blueberry Banana Muffins


Do you ever put a banana in your bag for later, and then forget about it until much later? And it's all mushy and weird?
And you kind of don't want it anymore?Well, today I found yesterday's banana and decided to make some muffins.


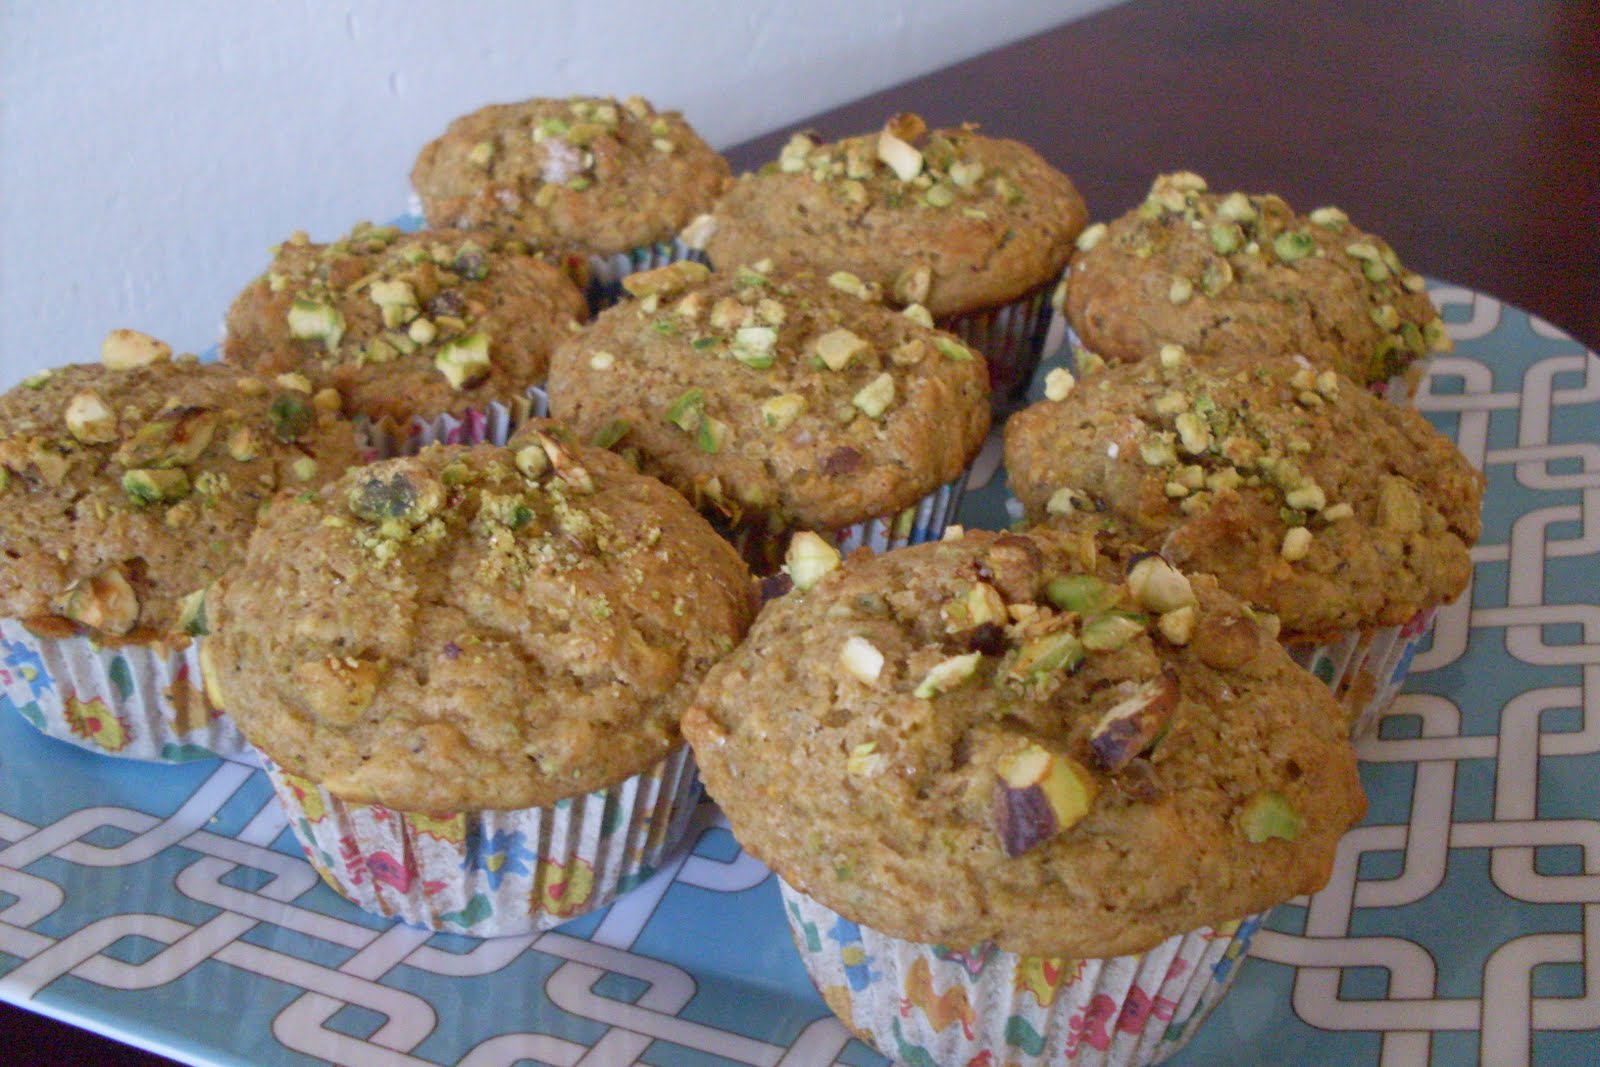
A note about this recipe: you might think it's a really bad idea to put vinegar in your muffins, but you are wrong! It helps to leaven them (with the baking soda) and it makes them tender and lovely.


dry ingredients:1 c. all purpose flour
1 c. whole wheat flour
1/4 c. cornmeal
1 1/2 tsp. baking powder
1 tsp. baking soda
1/4 tsp. salt
1 tsp. cinnamon
1/4 tsp. nutmeg1/8 tsp. cloves
1/8 tsp. cardamom

wet ingredients:
1 large mushy ripe banana
1/3 c. canola oil
1/2 c. soy milk + 1 tsp. apple cider vinegar
1/4 c. maple syrup
1 small container plain or vanilla soy yogurt (6 oz., or 1/2 c. plus 2 Tbsp.)
1/4 c. water or additional soy milk
1/2 c. frozen or fresh blueberries
Glaze: 1/4 c. granulated sugar dissolved in 1/3 c. warm soy milk

1. Preheat oven to 350 F. Grease a muffin pan, and line with paper liners if you like. (They're optional here: these muffins are sturdy enough that you can bake them right in the pan if you want to.)
2. In a medium bowl, combine all the dry ingredients.
3. In a large bowl, mash the banana with a fork.
4.In a small bowl, pour the cider vinegar into the soy milk and stir. Set aside for five minutes until the milk has curdled. This will look really really weird and gross, but it will be fine, trust me. After five minutes, add this all the remaining wet ingredients to the banana
and mix thoroughly.
5. Stir the dry ingredients into the wet until just combined. Do not overmix, or the muffins will be tough. It's ok to have a few small lumps, I promise!
It still won't look delicious, but have some patience!

6. Stir in the blueberries. If they are frozen, don't thaw them first, or it will turn your batter purple. Better to just let them thaw in the oven!
7. Spoon the batter into the prepared muffin pan and bake for 18 minutes, or until a knife inserted into the center of a muffin comes out clean.

8. Spoon glaze over the muffins while they're still warm in the muffin pan. Once they've cooled down a bit, you can leave them on a cooling rack or plate to cool the rest of the way.
Enjoy for breakfast, lunch and dinner. (Just kidding, really you should only enjoy them for breakfast and lunch.)


Wednesday, April 21, 2010

The DIY yogurt experiment

Everyone likes yogurt, even us vegans. Especially when it's made of coconut milk (yum yum yum yum yum!)


But I get sick of paying a lot of money for it all the time, and besides, they stopped selling coconut yogurt in this town--probably because everyone else was sick of paying a lot of money, too.
So I decided to try to make my own. I have NO IDEA if it's going to come out well. But I hope it does cause how cool would that be?

I'm making it in a crock pot. (Who knew we had a crock pot? Not me.)

Ingredients:
2 cans coconut milk plus 1/2 can of water
about 1/2 cup already-made yogurt (I used Silk soy yogurt)
lots of time and patience

Time for an adventure? Here we go:
1. Pour the cans of coconut milk into the crock pot. You may be surprised at how much fat there is floating at the top of the can. Like, you'll have a hard time pouring it until you break it up and mix it around a little--that much fat. (Who ever said being vegan was healthy? Ha ha.)

2. Stir the coconut milk around a little to break up the clumps of fat. At this point I added a little bit of water, because it seemed really thick. I added about half a can.

3. Heat the coconut milk on low. Theoretically it's supposed to come to about 180 F to sterilize it, but guess what? It came out of a can so I'm gonna bet it doesn't have too many microbes in it, that's the point of canning. (But if it doesn't work out I'm gonna be embarrassed at my impatience!)

4. Once it reaches 110 F, it's time to turn off the crock pot, unplug it, and add your starter. My starter is plain old soy yogurt--I'm using Silk brand. It's important that you use a kind of yogurt that has live active cultures. You could certainly use a packaged yogurt starter, but I'm very low-tech. Also, if you have pre-packaged yogurt starter you probably don't need me telling you how to make yogurt, right? Cause I'm making this up as I go along.

5. Sorry, I got sidetracked. Where were we? Whisk in the yogurt (I used a spoon, my whisk is broken!) and then put the cover back on the crock pot. Wrap the whole thing in clean towels or something to keep it insulated and warm. I didn't have too many clean towels, so I wrapped it in a flannel sheet. Toasty toasty.

6. Check up on it after 8 hours or so. Hopefully, it will taste like yogurt, and not just like a big pot of coconut milk!

7. I checked my yogurt after 10 hours (the next morning) and it did indeed taste like yogurt--hooray! But it also didn't have a very satisfying texture; it had barely thickened at all. I even tried thickening some of it with agar and corn starch, but I wasn't pleased with the result. I've heard that it gets easier the more batches of yogurt you make. Next time I'm going to try culturing it in a sterilized glass mason jar instead of in the crock pot, and see if that works any better. For now I'm putting it in lots of tasty smoothies! And if I eventually perfect the yogurt recipe, I will definitely post it.


Sunday, April 18, 2010

happy birthday to Leta!

It was my roommate Leta's birthday a couple of days ago, and I baked up some cute lil cuppycakes (recipe from the book Vegan Cupcakes Take Over the World, which is not an exaggeration they are quite actually taking over the world.)
Anyway, here's an admittedly not-that-spectacular photo of one.
Remember, I'm not a photographer! I just like to bake!


Wednesday, April 14, 2010

Crumbly Apple-Pear Pie

I know, I know, April isn't exactly apple pie season. Well, I didn't have anything else to make into a pie, and the apples were looking sort of sad and old, and this seemed like the best way to make them into something delicious.
This is everything you like about apple crisp, combined with everything you like about apple pie.

You will need:
1 9" deep dish pie crust

3 medium sized apples
2 pears
About 3 Tbsp sugar, depending on how sweet your fruit is
1 tsp cinnamon
1/8 tsp ground ginger
a splash lemon juice, but I was out of lemon juice so I used scotch whiskey
a sprinkle of flour

Crumbly topping:
3 Tbsp oil
1 tsp water
3/4 cup brown sugar*
1 tsp vanilla extract
flour

1. Preheat oven to 350 F.
2. Wash, peel, core, and thinly slice your apples and pears.
3. In a large bowl, combine the fruit with the sugar, cinnamon, ginger, lemon juice/whiskey, and a small sprinkle of flour. Stir that up until the fruit is coated.
4. Make the topping: combine oil. water, brown sugar and vanilla. Add in flour 1/4 cup or so at a time and mix it in with your hands until it forms a crumbly mixture that resembles cookie dough.
5. Dump the fruit into the pie crust, and sprinkle the crumb topping over it. Bake for about 30 minutes, or until the fruit is soft--you can tell by poking a sharp knife into it. The knife should go in pretty easily.
6. Don't let your roommates eat it all on the first day, because left-over apple pie is the world's best breakfast.

P. S. I know I know the photo is not too pretty. My excuse: it was too yummy to photograph; all I could do was just gobble it up.

Thursday, April 8, 2010

Citrus-stachio muffins


I love citrus, and I love pistachios, and I love citrus with pistachios. And this is supposed to be a blog about muffins, right? So lets make some muffins!

1/2 cup apple sauce
1/3 cup sugar
2 Tbsp. oil
zest of 1 lemon and 1 orange (wash those lil' guys before zesting, please!)
juice of 1 lemon and 1 orange, plus enough soy- or other milk to add up to 1 1/3 cups
1/2 cup VERY finely chopped pistachios
1 1/2 cups all purpose flour
1/2 cup whole wheat flour
1/2 tsp. salt
2 tsp. baking powder
1 tsp. baking soda
optional: coarsely chopped pistachios and coarse sugar for decoration

1.Preheat the oven to 350 F. Line a muffin pan with paper liners and spray with oil to prevent any stickage.

2. In a medium bowl, combine orange juice, lemon juice, and milk. The milk will probably start to curdle; don't freak out, you didn't do anything wrong! Once it has thickened a little, whisk in the sugar, apple sauce, and oil.

3. In a large bowl, sift or whisk flours, salt, baking powder, and baking soda. Whisk in the grated zest and the finely chopped pistachios.

4. Add the wet ingredients into the dry and stir just until combined. (I like to do this with a rubber spatula.) A few lumps in the batter are ok, so don't over-mix!

5. Scoop the batter into the lined muffin tins, and sprinkle the tops with coarsely chopped pistachios and coarse sugar. Bake for about 20 minutes, or until a toothpick stuck in the center comes out clean. If you can't wait to devour them, I understand but they're tastier after they've cooled down to room temperature.

Monday, March 29, 2010

Macaroons


These are a classic for Passover! In my family we always have those ones from a can but, come on! Everybody knows, cookies are supposed to come from the oven!

These are incredibly easy to throw together, and you can make them a couple of days in advance, just store them in a tupperware once they're cool.

Yield 2 dozen cookies

1 (7 oz.) bag sweetened shredded coconut
2/3 cups slivered almonds
1/2 cup matzoh meal for cake--this type is much finer than regular matzoh meal
1/3 cup apple sauce
1/3 cup agave nectar
1 Tbsp oil
1/4 cup soymilk (or substitute coconut milk for extra coconut flavor! But I didn't have any so I used soy.)
Optional: chocolate, to melt & drizzle across the tops

1. Preheat the oven to 350 F. Put the almonds in a blender or food processor and pulse until they're ground. When they're done, they should look sort of like sand.
2. Put the coconut, ground almonds, and matzoh meal in a bowl and use your hands to combine them and break up any big clumps of coconut.
3. Mix the apple sauce, oil, and agave, and pour this into the coconut mixture.
4. If it's doesn't hold together easily, add a little of the soy milk until it's wet enough to hold together.
5. Use a tablespoon to pick up balls of dough and roll them LOOSELY in your hands, just to help it keep its shape, but you don't want to squeeze it too hard. Place the cookies on a lightly greased baking sheet. You can put them pretty close together, because they won't spread.
6. Bake for about 10 minutes, until the coconut looks nice and golden. Be careful with them when they're still warm; they'll fall apart easily. I think the safest way to get them onto a cooling rack is with a thin metal spatula.

For that Mounds Bar effect, you can drizzle the tops with melted chocolate once they're cool.
Enjoy!

Note: if you can't find the special cake matzoh meal, you can put some regular matzoh meal through the blender until they're the consistency of flour.